# Basement Sauna Ventilation: The High-Low Method, Explained
Quick answer. Ventilation is the single technical detail that separates a 20-year sauna from a 5-year mould problem. Done right, you have an even temperature, fresh air during use, and a cabin that dries out cleanly between sessions. Done wrong, you have stratified hot/cold zones, stale air, and chronic moisture trapped behind the cedar.Ventilation is the single technical detail that separates a 20-year sauna from a 5-year mould problem. Done right, you have an even temperature, fresh air during use, and a cabin that dries out cleanly between sessions. Done wrong, you have stratified hot/cold zones, stale air, and chronic moisture trapped behind the cedar.
This guide explains the high-low ventilation method — the universally accepted standard used in Finnish saunas, sized and adapted for Toronto basement conditions. For the broader build context, see our Basement Sauna Installation Toronto 2026 Guide.
The Core Principle
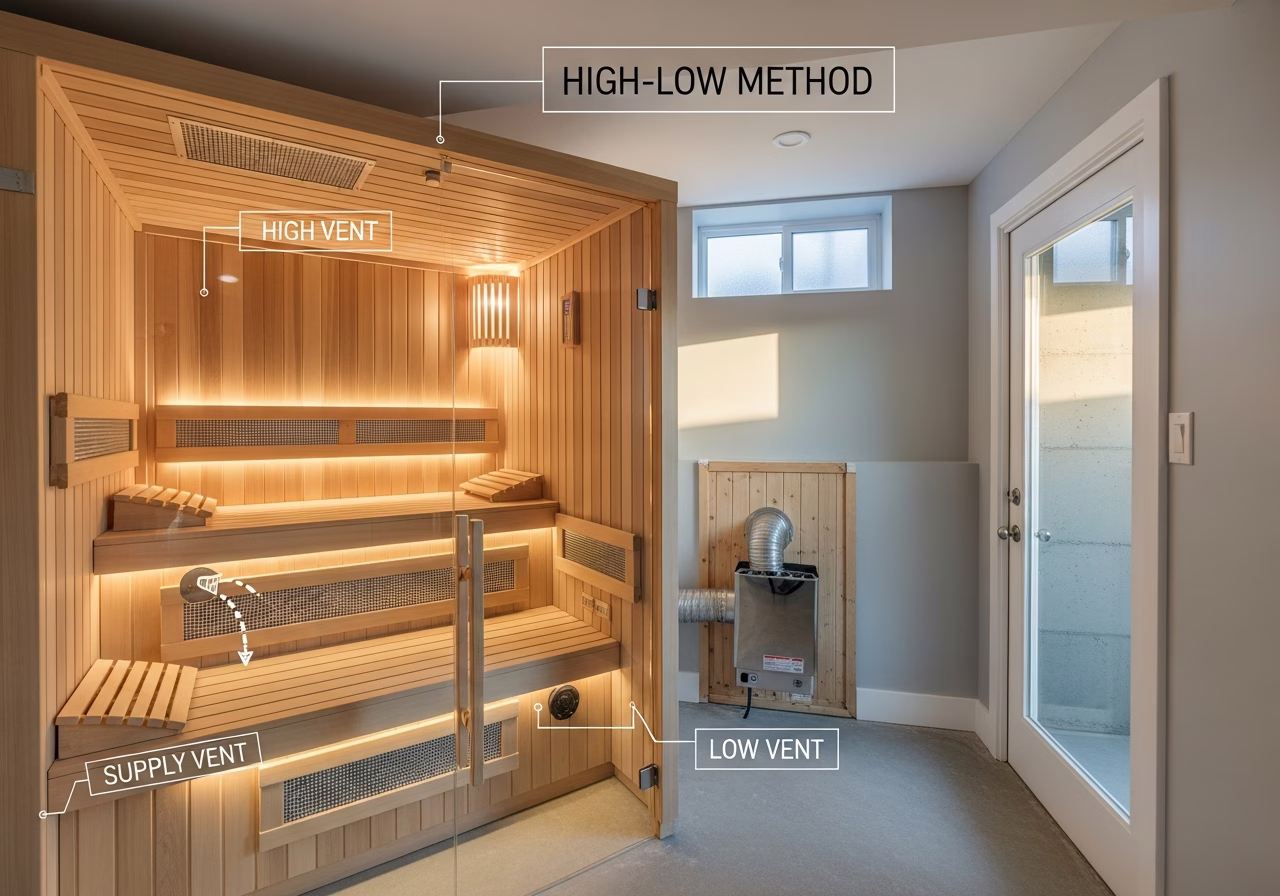
Hot air rises. Sauna air at 80–95°C is much less dense than the cool air entering at floor level. To get fresh air *through* the cabin (not just over the top), you need:
- 1. Intake low — fresh air enters near floor on the heater wall.
- 2. Heater warms it — air rises naturally as it heats.
- 3. Exhaust high — stale, moisture-laden air exits near ceiling on the *opposite* wall.
This creates a continuous diagonal airflow path. Done correctly, you get 6–8 air changes per hour during use — enough to keep oxygen fresh and prevent CO₂ buildup, without dumping so much heated air that the heater works overtime.
Intake Placement & Sizing

Position
- Height above floor: 6–12" (15–30 cm). Below this, dust collects; above this, the cool entering air bypasses the heater stones.
- Wall location: Heater wall. The intake is behind, under, or directly beside the heater so that incoming cool air immediately encounters the hot stones and rises.
Size
Standard residential sizing: 4"×8" rectangular or 6" round for cabins up to ~50 sq ft. Larger cabins (50+ sq ft) may use 8" round.
The intake should be roughly balanced with the exhaust — not radically smaller (which restricts circulation) or larger (which creates positive pressure that fights exhaust).
Damper
Adjustable damper or sliding cover so the user can:
- Open fully during use for full circulation.
- Close partially during warmup to retain heat for faster heat-up.
- Open fully during post-session purge to dry the cabin.
Source of intake air
For a basement sauna, intake air comes from the surrounding basement room. This is fine provided the basement itself isn't a moisture problem. If the basement runs at 65%+ relative humidity, you're pulling humid air into the sauna — and dehumidification of the wider basement should be addressed first.
Some premium builds run a dedicated intake duct from outside the home (or from the home's HRV/ERV system). This adds $1,500–$3,500 but provides the cleanest, driest intake air. Optional for most builds.
Exhaust Placement & Sizing
Position
- Height: Near the ceiling — typically within 6" of the ceiling, on the opposite wall from the intake.
- Wall location: Opposite wall from the heater. Same-wall venting short-circuits the airflow — cool air enters and immediately exits without circulating through the cabin.
Size
Match the intake size or slightly larger. Standard: 4"×8" rectangular or 6" round.
Ducting
This is where most failed installs go wrong. The exhaust must be ducted to exterior — never into the surrounding basement room. Every sauna session ejects 80°C+ humid air; if that goes into the basement, basement humidity rises, mould develops on cold-side walls (often invisible behind insulation), and the entire house starts smelling musty within months.
Standard duct path:
- 1. Insulated 6" round duct from cabin ceiling exhaust.
- 2. Run through ceiling joists (or surface-mounted on basement ceiling).
- 3. Penetrate foundation/exterior wall — typically high on the wall, above grade.
- 4. Terminate with a louvered exterior vent cap, screened against insects and rodents.
- 5. Damper at the cabin — adjustable for warmup/use/purge phases.
Insulation on the duct
Critical detail: insulate the exhaust duct through any unheated space. Uninsulated metal duct in a cool basement causes condensation inside the duct as humid sauna air cools — water collects, drips back, and corrodes the duct from the inside. R-6 minimum insulation, ideally R-8.
Inline exhaust fan
Most professional installs include an inline exhaust fan on the duct, with three operating modes:
- Off during warmup (don't pull heat out before the cabin is up to temperature).
- Low or off during early use (passive convection is usually enough; the fan helps if user load is high).
- High during post-session purge for 30–60 minutes on a timer.
A 4–6" inline fan rated 100–250 CFM is standard. Brands like Fantech, Soler & Palau, and Panasonic make code-compliant residential models. Budget: $200–$500 for the fan + ducting.
Post-Session Purge — The Detail Most People Miss
After every session, the cabin is hot and humid. If you close the door and walk away, that moisture sinks into the wood, the foil vapor barrier, and any porous surface. Within weeks of regular use without purging, mould begins.
The purge protocol:
Need professional home renovation?
Call RenoHouse at 289-212-2345 or get a free estimate today.
Get Free Estimate →- 1. Open the cabin door fully. Most of the moist air evacuates within 15–20 minutes via natural convection.
- 2. Run the inline exhaust fan on a 30–60 minute timer. Pulls remaining moisture out via the exterior duct.
- 3. Open the intake damper fully to allow makeup air.
- 4. Wipe benches and floor with a clean towel to remove standing moisture.
A wall switch or timer that defaults to "purge mode" after the heater shuts off makes this effortless — and it's worth specifying in any premium build. Many smart controllers (Harvia Xenio, HUUM UKU) automate the post-session purge.
Air Change Targets
| Phase | Air Changes Per Hour (ACH) |
|---|---|
| Warmup (cabin heating up) | 1–2 (mostly closed) |
| Active use (occupants in cabin) | 6–8 |
| Post-session purge | 10–15 |
| Idle (cabin off, between sessions) | 1–2 |
These are professional standards. Hitting them requires correctly sized intake, exhaust, and inline fan — all designed and installed together, not retrofitted piecemeal.
Common Ventilation Mistakes
1. Same-wall vents
Both intake and exhaust on the same wall. Air short-circuits. Stratification develops. Most common amateur mistake. Fix: relocate one vent to opposite wall.
2. Exhaust into the basement
Saves $300–$800 on ducting. Costs you $5,000–$15,000 in mould remediation 2–3 years later. Always duct to exterior.
3. No inline fan
The cabin "kind of" dries out via passive convection. In a Toronto basement, particularly in summer when ambient humidity is high, passive isn't enough. Add the fan.
4. Uninsulated exhaust duct
Condensation inside the duct, dripping back into the cabin or causing duct failure. Insulate to R-6 minimum.
5. Oversized exhaust during warmup
Running the fan during warmup steals heat. The cabin takes 60+ minutes to reach temp instead of 30 minutes. Use the damper and fan timer to keep warmup tight.
6. Missing intake damper
User can't restrict intake during warmup. Same outcome — slow warmup, frustrating use.
7. No post-session protocol
Ventilation hardware is correct but the user doesn't actually run the purge. Mould develops anyway. Solution: smart controller or default-on timer.
The full mistake catalogue is in 10 Common Basement Sauna Installation Mistakes.
OBC and Code Requirements
The Ontario Building Code requires general mechanical ventilation when natural is inadequate (minimum ½ ACH for general spaces). For saunas specifically, local building inspectors apply industry-standard 6–8 ACH during use as the de facto standard.
The exterior vent termination must respect setback distances (typically 0.6 m from property line) and not violate any condo bylaws. Heritage-designated homes may require additional Heritage Preservation Services review. Full permit walkthrough in Permit Requirements for Home Sauna in Toronto.
Special Cases
Hybrid Finnish + Infrared Saunas
Hybrid cabins still need full Finnish-grade ventilation — the ventilation design is driven by Finnish use, not IR use. Don't shortcut. Detail in Hybrid Sauna Builds: Why Toronto Homeowners Choose Finnish + Infrared.
Infrared-Only Cabins
Infrared cabins at 50°C generate much less moisture than Finnish at 90°C. Many infrared cabins ship with passive vent grilles only — and that's adequate for residential use. Skip the inline fan and exterior ducting. The savings ($500–$1,500) are real.
Cabins With Adjacent Cold Plunge or Shower
Wellness suite builds with cold plunge or shower nearby need:
- Floor drain at the wettest point.
- Bathroom-style exhaust for the shower zone (separate from sauna exhaust).
- Combined HRV/ERV integration is worthwhile to manage humidity across the whole wellness room.
Full layout in Sauna + Cold Plunge: Designing a Wellness Suite in Toronto Basement.
Heritage Toronto Homes
If the foundation is rubble stone or unreinforced brick (common in pre-1920 Toronto homes), exterior penetration may need engineering. A vertical chase up to a high exterior wall above grade is sometimes the cleanest path. Plan in advance.
Cost Summary
Realistic 2026 GTA pricing for proper ventilation on a permitted basement Finnish sauna:
| Item | Cost |
|---|---|
| Intake grille + damper | $50–$150 |
| Exhaust grille + damper | $50–$150 |
| 6" insulated round duct + connectors | $100–$300 |
| Foundation/exterior wall penetration + sleeve | $150–$400 |
| Exterior louvered vent cap | $40–$100 |
| Inline exhaust fan (Fantech, S&P, Panasonic) | $200–$500 |
| Wall switch / timer for fan | $40–$120 |
| Labour | $400–$800 |
| Total | $1,030–$2,520 |
In context of a $20K Finnish sauna, ventilation is 5–12% of total project cost — and disproportionately load-bearing on long-term success. Don't compromise.
A Word on Heritage / Older Toronto Homes
Many post-2000 condo townhomes have raw basement ceilings of 6'10" — too low for a Finnish sauna. Saunas in these spaces are typically infrared (lower heat, less ventilation demand). Heritage homes often have rubble foundations that need engineering for exterior penetration. Always scout the exterior vent path in Phase 1 of the project — see How to Add a Sauna to Your Basement: 7-Step Guide for GTA.
FAQ
Can I use the home's HVAC system instead of dedicated ventilation?Generally no. Sauna humidity and temperature would push moisture into the duct system and damage HVAC components over time. Dedicated ducting to exterior is the standard.
My basement has only one exterior wall — can I still vent?Yes — most installs only need one exterior penetration (the exhaust). The intake comes from the surrounding basement room. If you need both ducted (premium HRV builds), an interior chase or a rim joist penetration is usually feasible.
Should the exterior vent be on the front of the house?Aesthetically no — most installers route to the side or rear of the home. A louvered grille on the back wall above grade is the most common path.
Do I need a CO/smoke detector for a sauna?Smoke alarm just outside the sauna door (interconnected with the home's alarm system per OBC 9.10.19). Do not place a smoke alarm inside the sauna — heat triggers false alarms and damages the unit.
Can I retrofit better ventilation into an existing sauna?Often yes — adding an inline exhaust fan and exterior ducting to an existing cabin runs $1,500–$3,000. Worth doing if you suspect inadequate ventilation is causing moisture issues.
---
Designing your ventilation? RenoHouse engineers high-low ventilation systems with proper exterior ducting on every basement sauna we build. Book a free assessment on our basement sauna installation service page.
Sources & References
Authoritative sources cited in this guide:
- Ontario Building Code — OBC official text
- Toronto Building Permits — City permit portal
- Tarion Warranty — Ontario warranty regulator
- CSA Group Standards — Canadian standards
Continue Reading
- 10 Common Basement Sauna Installation Mistakes (How to Avoid)
- How to Add a Sauna to Your Basement: 7-Step Guide for GTA
- Basement Sauna Installation Toronto: 2026 Cost & Permit Guide