# How to Install a Murphy Bed in Toronto: Step-by-Step Guide
Quick answer. Installing a Murphy bed in a 2026 Toronto condo or home looks deceptively simple — until you realize that the wrong wall anchor will let 250 lbs of bed and mattress pull off the wall the first time you open it.Installing a Murphy bed in a 2026 Toronto condo or home looks deceptively simple — until you realize that the wrong wall anchor will let 250 lbs of bed and mattress pull off the wall the first time you open it. This step-by-step guide covers what a professional installation actually looks like, what an intermediate DIY-er can handle, and what to leave to the pros.
For the broader project context, see the Murphy Bed Installation Toronto pillar guide. For DIY-versus-pro decision logic, see DIY vs Professional Murphy Bed Install Toronto.
Step 1: Verify the Wall Type
Toronto walls fall into three categories:
- 1. Wood-stud framing. Most pre-1980 homes and modern lowrise/townhomes. Studs at 16" or 24" on center.
- 2. Steel-stud framing. Many post-2000 condo interior walls. 25-gauge or 20-gauge steel at 16" or 24" on center.
- 3. Concrete or masonry. Modern condo demising walls and core walls. Solid concrete or concrete block.
Use a stud finder to map studs across the wall area where the cabinet will mount. For concrete walls, use a hammer or knock test — concrete sounds dull and solid; drywall over steel studs sounds hollow.
Critical: Murphy bed cabinets must anchor into structure, not just drywall. Toggle bolts and drywall anchors are not enough.Step 2: Confirm Dimensions
Measure with a tape (not a laser distance meter — too easy to misread):

- Wall width at floor, mid-height, and ceiling. Most walls are not perfectly square.
- Ceiling height at the cabinet position (also measure 6" out, 12" out, 24" out — drift toward the ceiling on out-of-plumb walls).
- Wall plumb. Hold a 4' level vertically — gap at top or bottom indicates out-of-plumb wall (common in older buildings).
- Floor flatness. Check with a level along the cabinet base position.
Compare against the manufacturer spec sheet. For vertical queen, you need 88"–92" ceiling; for horizontal queen, 66"–68". Full sizing in Vertical vs Horizontal Murphy Bed Toronto.
Step 3: Locate Anchor Points
For wood-stud walls:
- Mark stud locations on the wall with painter's tape.
- Cabinet should anchor into a minimum of 2 studs (3+ preferred).
- Use 1/4" x 4" lag bolts into stud centers.
For steel-stud walls:
- 25-gauge steel won't reliably hold a Murphy bed alone. Add wood blocking (2x6 or 2x8) between studs before drywall, OR use steel-stud-rated heavy-duty toggles (Toggler Snaptoggle BB or similar) plus through-bolting where possible.
- For new construction, install 2x8 horizontal blocking at the cabinet anchor heights.
For concrete walls:
- Use Tapcon screws (1/4" or 5/16", minimum 2.75" embedment) or Hilti HUS-EZ anchors.
- Drill with hammer drill and carbide bit, vacuum dust, drive anchor.
- Minimum 6 anchors for queen vertical cabinet.
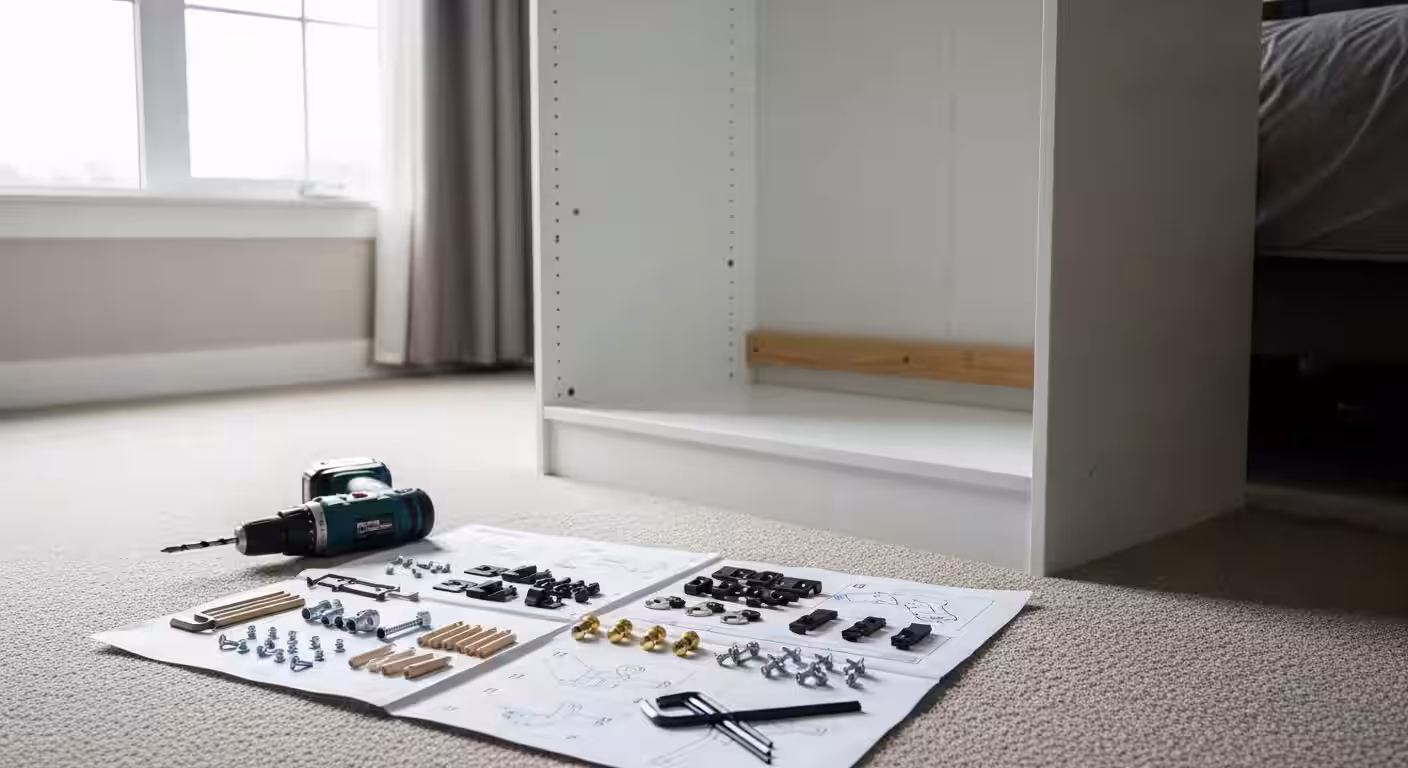
Step 4: Assemble the Cabinet
Most Murphy bed cabinets ship flat-pack:
- 1. Lay out parts on a clean floor with packing material as protection.
- 2. Identify the back panel (largest piece, holds the lift mechanism).
- 3. Connect side panels to back using cam locks or wood screws per manufacturer instructions.
- 4. Install top, bottom, and any internal shelving.
- 5. Verify squareness with a framing square — if out of square, the bed won't deploy smoothly.
For Tier 2 brands (Wallbeds n More, Murphy Wall Bed Co.), the cabinet is delivered partially pre-assembled. For Tier 1 IKEA-hack kits, full assembly is required.
Step 5: Attach the Lift Mechanism
The lift mechanism is typically pre-installed in the back panel. If shipped separately:
- 1. Position the mechanism plate on the back panel per template.
- 2. Drive screws (manufacturer-supplied) — do not substitute longer or shorter screws.
- 3. Verify the mechanism arms swing freely without binding.
- 4. Connect bed-frame mount points to mechanism arms.
For piston mechanisms, the piston(s) come pre-charged. Do not attempt to recharge or rebuild — replace if defective.
Need professional renovation?
Call RenoHouse at 289-212-2345 or get a free estimate today.
Get Free Estimate →Step 6: Move the Cabinet to Position
The fully-assembled cabinet for a queen vertical Murphy bed weighs 200–350 lbs depending on tier. You need:
- 2–3 people minimum. One person cannot safely lift this.
- Furniture sliders under the cabinet to walk it across hard floors.
- Floor protection if your finished floor is hardwood or LVP.
- Door clearance verified — many Toronto condo doors are 32"–34" wide, and Tier 2 cabinets can exceed that. Sometimes the cabinet must be partially disassembled to enter the unit.
Position the cabinet against the wall, level it with shims under the base if needed (check side-to-side AND front-to-back).
Step 7: Anchor to Wall
Drill pilot holes through the cabinet back into the wall at the marked anchor points. Drive lag bolts (wood) or Tapcons (concrete) until snug. Do not over-tighten — you'll crush the cabinet back panel.
Verify anchor engagement: pull on the cabinet hard from the front. It should not budge.
For the queen vertical: minimum 4 anchors (top corners + 2 mid-height stud locations). Tier 2 manufacturers often spec 6–8 anchors.
Step 8: Install the Mattress
Lay the mattress on the bed frame. Most Murphy beds use mattress retainer straps or a foot-end retaining bar to hold the mattress in place when the bed is folded up.
Mattress thickness check: Most Murphy beds support 8"–12" thickness. Pillow-tops over 14" will not fit. See Murphy Bed Mattress Types: What Works and What Doesn't for compatible mattress recommendations.Step 9: Calibrate the Lift Mechanism
This is where most DIY installs go wrong. Piston-mechanism Murphy beds have weight calibration:
- 1. Manufacturer ships piston(s) pre-tuned for a specified mattress weight range.
- 2. If your mattress is heavier than spec, add the secondary piston (often included).
- 3. If lighter than spec, the bed will spring up too aggressively — manufacturer ships shims or weight-add bars.
Test deployment:
- With the mattress installed, slowly lower the bed.
- It should descend smoothly with light hand pressure.
- It should not slam down in the last 6–12".
- Raising the bed should require light upward pressure, not significant force.
If the bed slams or springs, recalibrate per manufacturer instructions before continuing use.
Step 10: Install Trim and Finish
Trim ties the cabinet into the wall finish:
- 1. Crown moulding at the top to bridge cabinet-to-ceiling gap.
- 2. Baseboard return to bridge cabinet-to-floor gap.
- 3. Side trim to bridge cabinet-to-wall gap on each side.
For Tier 2+ installs, trim is often pre-supplied with the kit. For Tier 1 IKEA-hack, source from a local moulding shop or Home Depot.
Caulk all trim-to-wall and trim-to-cabinet seams with paintable caulk. Touch-up paint if cabinet finish is paint-grade.
Step 11: Final Testing
Deploy and stow the bed 5–10 times to verify smooth operation. Check:
- No binding or scraping at the pivot points.
- Mattress retainer holds mattress when bed is closed.
- Bed stays open without external support.
- Bed stays closed without latching (most modern mechanisms self-lock).
Make a final adjustment to the piston tension if the bed slams or springs.
Toronto-Specific Considerations
Condo Concrete Walls
Most Toronto condo demising walls and at least one perimeter wall are 8" poured concrete. Drilling Tapcons into concrete is permitted under most condo declarations, but:
- Drilling through to the unit next door is prohibited (use anchors with appropriate embedment depth, typically 2.75"–3").
- Some heritage condos restrict drilling — check status certificate.
- Hammer drill noise may be subject to condo quiet hours (typically 9am–9pm Mon–Sat).
Hard-Loft Brick Walls
In King West and Liberty Village hard lofts, the perimeter walls are often exposed brick. Anchoring to brick requires:
- Drill into the mortar line, not the brick face (less likely to crack).
- Use sleeve anchors or epoxy anchors rated for brick.
- Consult a structural engineer for any anchor over 1/4" diameter.
Older Walk-Up Plaster Walls
Pre-1950 Annex/Cabbagetown walls are often plaster over wood lath. Plaster doesn't hold anchors well — the lath chips out, the plaster cracks. Best practice:
- Locate studs (16" on center is typical but sometimes irregular).
- Use 4" or longer lag bolts to penetrate plaster + lath + stud.
- Consider chipping out a section of plaster down to studs, installing wood blocking, and patching plaster around it.
What an Intermediate DIY-er Can Handle
- Tier 1 IKEA-hack kit assembly and install on wood-stud walls.
- Cabinet assembly per manufacturer instructions.
- Mattress install and basic mechanism testing.
What to Hire Out
- Tier 2+ installs where the cabinet weight, mechanism complexity, and finish-grade trim need professional handling.
- Concrete-wall anchoring with hammer-drill experience.
- Steel-stud walls requiring blocking installation.
- Heritage walls (plaster, brick) where wall integrity is at stake.
For the full DIY-vs-pro framework, see DIY vs Professional Murphy Bed Install Toronto. For mistakes to avoid during install, see Murphy Bed Installation Mistakes to Avoid.
---
Need a Toronto Murphy bed installer? RenoHouse handles every step from wall verification through final trim across Toronto and the GTA. Book a free site measurement on our Murphy bed installation service page.
Sources & References
Authoritative sources cited in this guide:
- Ontario Building Code — OBC official text
- Toronto Building Permits — City permit portal
- Tarion New Home Warranty — Ontario new-build warranty regulator
- HCRA — Home Construction Regulatory Authority — Ontario builder/vendor licensing
Continue Reading