\n*For a complete overview, see our electrical Guide.*\n# Pot Lights Installation Cost Toronto 2026: Per Light Pricing, Layout & LED Options
Pot lights (recessed lighting) are the most popular lighting upgrade in Toronto homes — and for good reason. They provide clean, even illumination without taking up visual space, work in every room, and instantly modernize any ceiling.
In 2026, expect to pay $150–$300 per pot light installed in Toronto, with most homeowners spending $1,500–$4,000 for a typical project of 8–15 lights. This guide covers everything from cost factors to layout planning to smart controls.
Cost Per Light
Pot light installation costs vary based on several factors. Here's the pricing breakdown:
| Component | Cost Per Light |
|---|---|
| LED pot light fixture | $20–$60 |
| Wiring and electrical work | $80–$150 |
| Drywall cutting and finishing | $20–$50 |
| Permit (amortized across project) | $10–$25 |
| Total per light | $150–$300 |
What Affects Per-Light Cost?
| Factor | Impact on Price |
|---|---|
| Existing wiring access | Accessible attic above = cheapest. Finished ceiling below another floor = most expensive |
| Number of lights | More lights = lower per-unit cost (volume pricing) |
| Ceiling type | Open joist ceiling: easy. Insulated ceiling: moderate. Concrete: expensive |
| Fixture quality | Basic LED ($20) vs. premium gimbal/adjustable ($40–$60) |
| Dimming | Adding dimmer switch: +$50–$150 per circuit |
| Code requirements | IC-rated housings required where insulation is present |
Project Cost Examples
| Project | # of Lights | Total Cost |
|---|---|---|
| Kitchen upgrade | 6–8 | $1,000–$2,000 |
| Kitchen + living room | 12–16 | $2,000–$4,000 |
| Basement finishing | 10–15 | $1,800–$3,500 |
| Whole main floor | 15–25 | $3,000–$6,000 |
| Full house (new construction) | 30–50 | $4,500–$10,000 |
LED vs Halogen
This isn't really a debate anymore — LED is the clear winner in every category — but here's the comparison for completeness:
| Feature | LED | Halogen |
|---|---|---|
| Cost per bulb | $8–$25 | $3–$8 |
| Lifespan | 25,000–50,000 hours | 2,000–4,000 hours |
| Energy use | 8–15 watts | 50–75 watts |
| Heat output | Very low | High (fire risk with insulation) |
| Color options | Warm to cool (2700K–5000K) | Warm only (2800K–3000K) |
| Dimmable | Yes (with compatible dimmer) | Yes |
| Annual cost (per light, 3 hrs/day) | $3–$5 | $18–$25 |
| IC-rated available | Yes (standard) | Limited |
Why LED Is the Only Sensible Choice
- 20-year lifespan — Install once, forget about it
- 90% less energy than halogen
- Safe with insulation — IC-rated LED fixtures can be in direct contact with insulation
- No heat — Won't heat up your room in summer
- Better light quality — Modern LEDs offer excellent color rendering (CRI 90+)
LED Color Temperature Guide
| Temperature | Look & Feel | Best For |
|---|---|---|
| 2700K (Warm White) | Cozy, yellowish | Bedrooms, living rooms, dining rooms |
| 3000K (Soft White) | Balanced, slightly warm | Kitchens, bathrooms, general purpose ⭐ |
| 3500K (Neutral) | Clean, neutral | Offices, task areas |
| 4000K (Cool White) | Bright, slightly blue | Garages, laundry rooms, workshops |
| 5000K (Daylight) | Very bright, blue-white | Art studios, detail work only |
Layout & Spacing Guide
Proper pot light layout is the difference between a beautifully lit room and one with dark spots or glare. Here's the formula:
The Basic Spacing Formula
Spacing = Ceiling height ÷ 2For an 8-foot ceiling: lights should be spaced 4 feet apart.
For a 9-foot ceiling: lights should be spaced 4.5 feet apart.
Need professional electrical services?
Call RenoHouse at 289-212-2345 or get a free estimate today.
Get Free Estimate →For a 10-foot ceiling: lights should be spaced 5 feet apart.
Wall Offset
Lights nearest walls should be placed half the spacing distance from the wall.For 4-foot spacing: first row of lights is 2 feet from the wall.
This prevents dark shadows along walls and illuminates artwork, bookshelves, and architectural details.
Common Layout Patterns
Grid Pattern — Evenly spaced rows and columns- Best for: Open-plan living rooms, basements, offices
- Creates uniform, even lighting throughout
- Best for: Dining rooms, bedrooms (with a central fixture)
- Washes walls with light, creates an open feeling
- Best for: Kitchens (over counters, island, sink), bathrooms (over vanity)
- Focuses light where you need it most
- Best for: Art walls, fireplaces, architectural details
- Uses adjustable/gimbal fixtures aimed at the feature
Kitchen Layout Tips
- Over the counter: Line of pot lights 12–18 inches from the wall, spaced 3–4 feet apart
- Over the island: Center lights over the island, 2–3 feet apart
- Over the sink: One light centered directly above
- General: Fill in remaining ceiling area with grid pattern
How Many Lights Per Room
Here's a quick reference for common Toronto room sizes:
| Room | Size | Recommended Lights | Spacing |
|---|---|---|---|
| Small bedroom | 10'×10' | 4 | 4' grid |
| Average bedroom | 12'×12' | 4–6 | 4'–5' grid |
| Primary bedroom | 14'×16' | 6–8 | 4'–5' grid |
| Kitchen | 10'×12' | 6–8 | 3'–4' (task + general) |
| Large kitchen | 12'×16' | 8–12 | 3'–4' |
| Living room | 14'×18' | 6–8 | 4'–5' grid |
| Open concept LR+K | 20'×30' | 12–18 | Mixed patterns |
| Bathroom (main) | 5'×8' | 2–3 | Over vanity + shower |
| Bathroom (primary) | 8'×12' | 4–6 | Perimeter + vanity |
| Basement (rec room) | 15'×25' | 8–12 | 4'–5' grid |
| Hallway | 4'×12' | 3–4 | 3'–4' in a line |
New Construction vs Retrofit
The installation method depends on whether your ceiling is open (new construction or renovation) or already finished.
New Construction (Open Ceiling)
- Cost: $100–$200 per light
- Wiring is run through open joists before drywall goes up
- Housings are mounted directly to joists
- Easiest, fastest, cheapest installation
- Best time to install: During any renovation where ceilings are opened
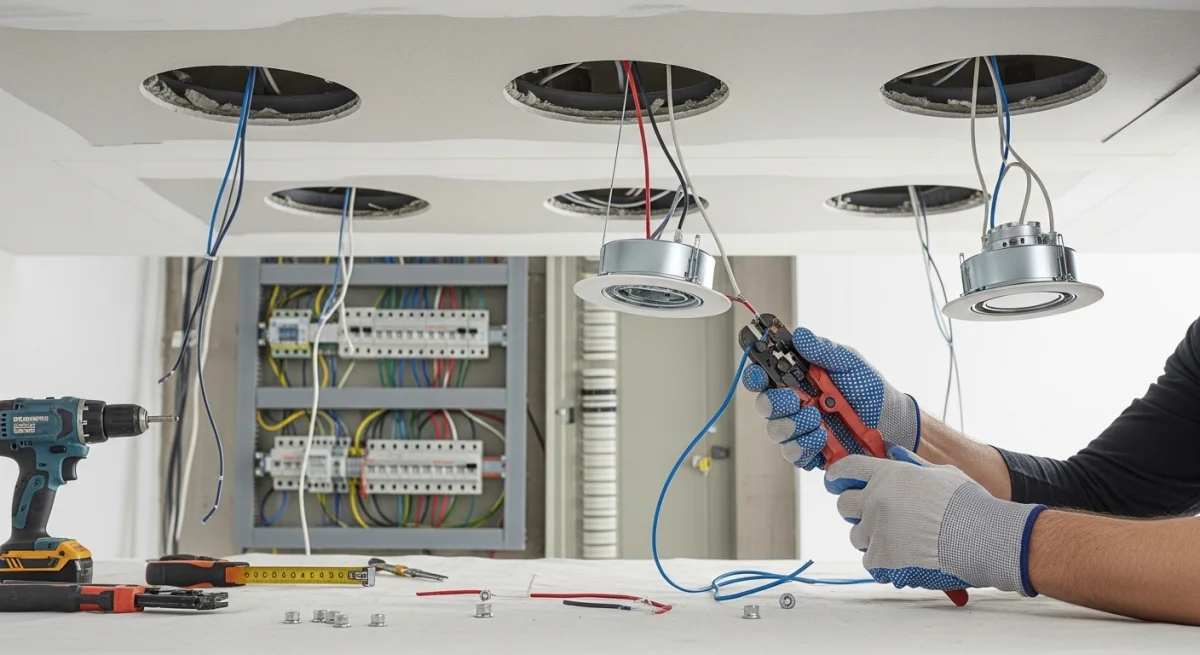
Retrofit (Existing Ceiling)
- Cost: $150–$300 per light
- Holes are cut in the finished ceiling
- Retrofit housings clip into the drywall from below
- Wiring is fished through the ceiling cavity
- May require attic access for running wire
- Drywall patching included for any exploratory holes
Challenging Retrofit Scenarios
| Scenario | Extra Cost | Solution |
|---|---|---|
| Insulated ceiling (no attic above) | +$30–$50/light | Fish wire through ceiling cavity, IC-rated fixtures |
| Concrete ceiling (condo) | +$100–$200/light | Surface-mount or shallow-profile LED panels |
| Second-floor ceiling (floor above) | +$50–$100/light | Fish wire between joists, may need access holes |
| Cathedral/vaulted ceiling | +$50–$150/light | Sloped ceiling housings, scaffolding needed |
Dimming & Smart Controls
Dimming transforms pot lights from simple overhead illumination into a flexible lighting system that adapts to every activity and mood.

Dimmer Switch Options
| Type | Cost | Features |
|---|---|---|
| Basic LED dimmer | $25–$50 | On/off + dim, wall switch |
| Smart dimmer (Wi-Fi) | $40–$80 | App control, schedules, voice control |
| Smart dimmer (Z-Wave/Zigbee) | $50–$100 | Hub-based, most reliable automation |
| Scene controller | $80–$150 | Multiple presets on one switch |
| Whole-home smart system | $500–$2,000 | Centralized control, multi-room scenes |
Important: LED Dimmer Compatibility
⚠️ Standard (incandescent) dimmers DO NOT work properly with LED pot lights. Using the wrong dimmer causes:
- Flickering
- Buzzing/humming
- Lights not turning fully off
- Reduced LED lifespan
Smart Home Integration
Modern smart dimmers integrate with:
- Google Home / Alexa / Apple HomeKit — Voice control ("dim the kitchen lights to 50%")
- Automation routines — Lights turn on at sunset, dim at bedtime
- Motion sensors — Hallway and bathroom lights activate automatically
- Circadian rhythm — Lights shift from cool (morning) to warm (evening) automatically
Zoning Your Lights
In larger rooms, wire pot lights on separate circuits/zones for maximum flexibility:
- Kitchen example: Counter lights on one dimmer, island on another, general ceiling on a third
- Living room: Perimeter lights separate from center lights
- Cost to add a zone: $50–$100 per additional circuit/dimmer
Frequently Asked Questions
Do I need a permit for pot light installation in Toronto?
Yes. Any new electrical circuit work in Ontario requires a permit and ESA inspection. Your electrician should handle the permit as part of the project. Adding lights to an existing circuit may not require a permit — ask your electrician.How long does pot light installation take?
6–10 lights in an existing ceiling: 1 day (6–8 hours). 15–25 lights (new construction): 1–2 days. Whole house retrofit: 2–3 days. Most projects are completed in a single day.Can I install pot lights in an insulated ceiling?
Yes, but you must use IC-rated (Insulation Contact) fixtures. These are designed to safely operate in direct contact with insulation. Non-IC fixtures require 3 inches of clearance from insulation — a fire code violation if buried in insulation. All modern LED pot lights are IC-rated by default.
What size pot light should I choose?
- 4-inch — Best for focused task lighting, small rooms, hallways
- 6-inch — Most popular, works for general lighting in any room ⭐
- 3-inch — Accent lighting, display cases, tight spaces
- 8-inch — High ceilings (10'+), commercial look
Will pot lights make my ceiling look like Swiss cheese?
Not if properly planned. Follow the spacing formula, maintain consistent layout, and use slim/low-profile trims that sit nearly flush with the ceiling. A well-designed pot light layout enhances a ceiling rather than cluttering it.
Can I add pot lights to my kitchen without a major renovation?
Absolutely. Retrofit pot lights are specifically designed for installation in existing ceilings with minimal disruption. An electrician can typically install 6–8 kitchen pot lights in a single day with no drywall demolition — just small circular cutouts.
Sources & References
Authoritative sources cited in this guide:
- Electrical Safety Authority (ESA) — Ontario electrical regulator
- Ontario Electrical Safety Code — OESC Section 26 / latest amendments
- Canadian Electrical Code Part I (CSA C22.1) — CEC standard
Related Reading
- Electrical Guide Toronto
- Ceiling Tiles: Types, Cost & Installation Guide for Toronto Homes
- Kitchen Renovation Guide Toronto| Costs, Timeline & Ideas
Continue Reading
- Electrical Guide Toronto
- Ceiling Tiles: Types, Cost & Installation Guide for Toronto Homes
- Kitchen Renovation Guide Toronto| Costs, Timeline & Ideas
Related Services