
# DIY Cold Plunge from Chest Freezer: Toronto Step-by-Step
Quick answer. The chest-freezer DIY cold plunge is real, popular, and ranges in quality from "totally functional $700 setup" to "built it for $1,800 and the wife uses it daily." We get asked about this build often enough that we wrote up the practical Toronto-specific guide.The chest-freezer DIY cold plunge is real, popular, and ranges in quality from "totally functional $700 setup" to "built it for $1,800 and the wife uses it daily." We get asked about this build often enough that we wrote up the practical Toronto-specific guide. Honest take: if you're handy, comfortable with low-voltage controls, and willing to maintain it carefully, the chest-freezer DIY works. If any of that sounds questionable, skip to a prefab unit.
For the broader build picture see our pillar Cold Plunge Installation Toronto: Complete 2026 Guide.
What the DIY Actually Is
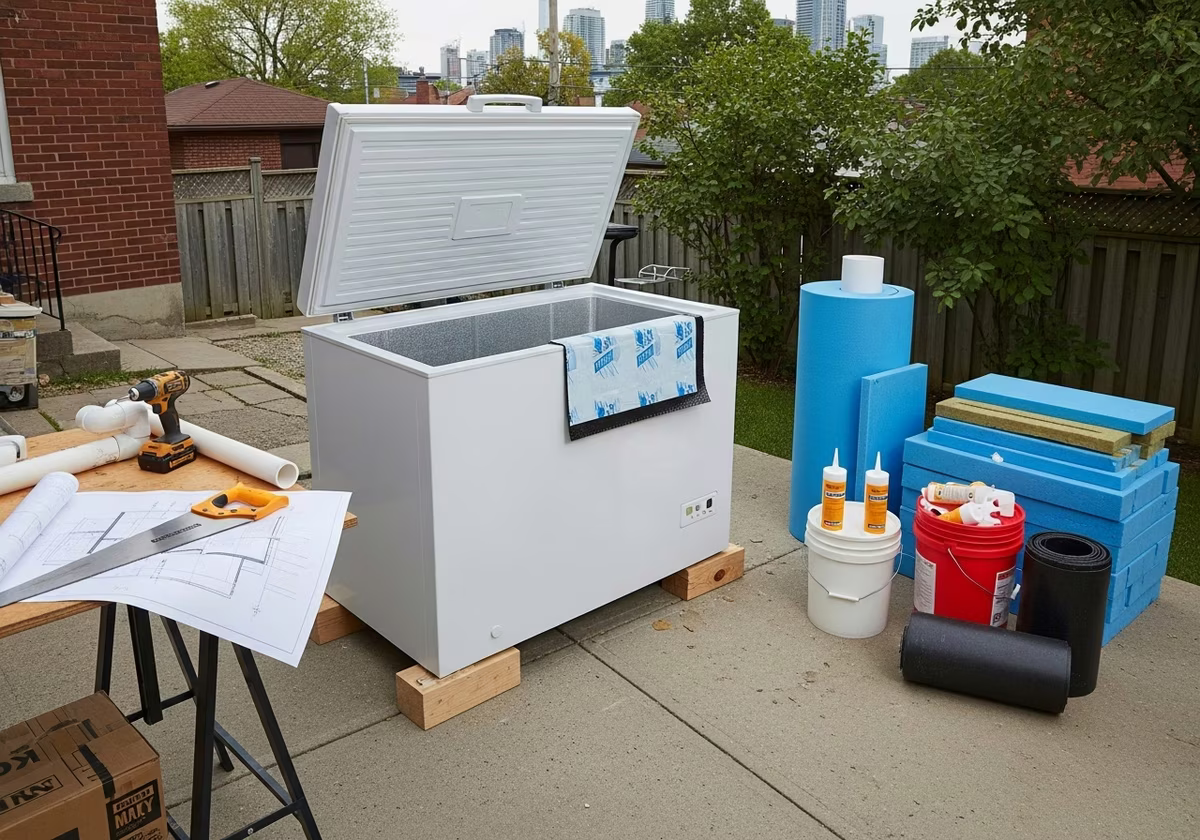
A standard chest freezer (5–10 cubic feet) is an insulated, well-sealed water-cold container with a refrigeration system already built in. The DIY converts it for body immersion by:
- 1. Sealing the interior with a food-grade liner (or plastic dip coat) so cold metal doesn't contact skin.
- 2. Filling with water.
- 3. Adding an external thermostat that overrides the freezer's stat, holding water above freezing (typically 4–10 C).
- 4. Adding circulation/filtration (small pump + cartridge filter) so water doesn't go stagnant.
- 5. Adding sanitation (ozone, UV, or H2O2 dosing).
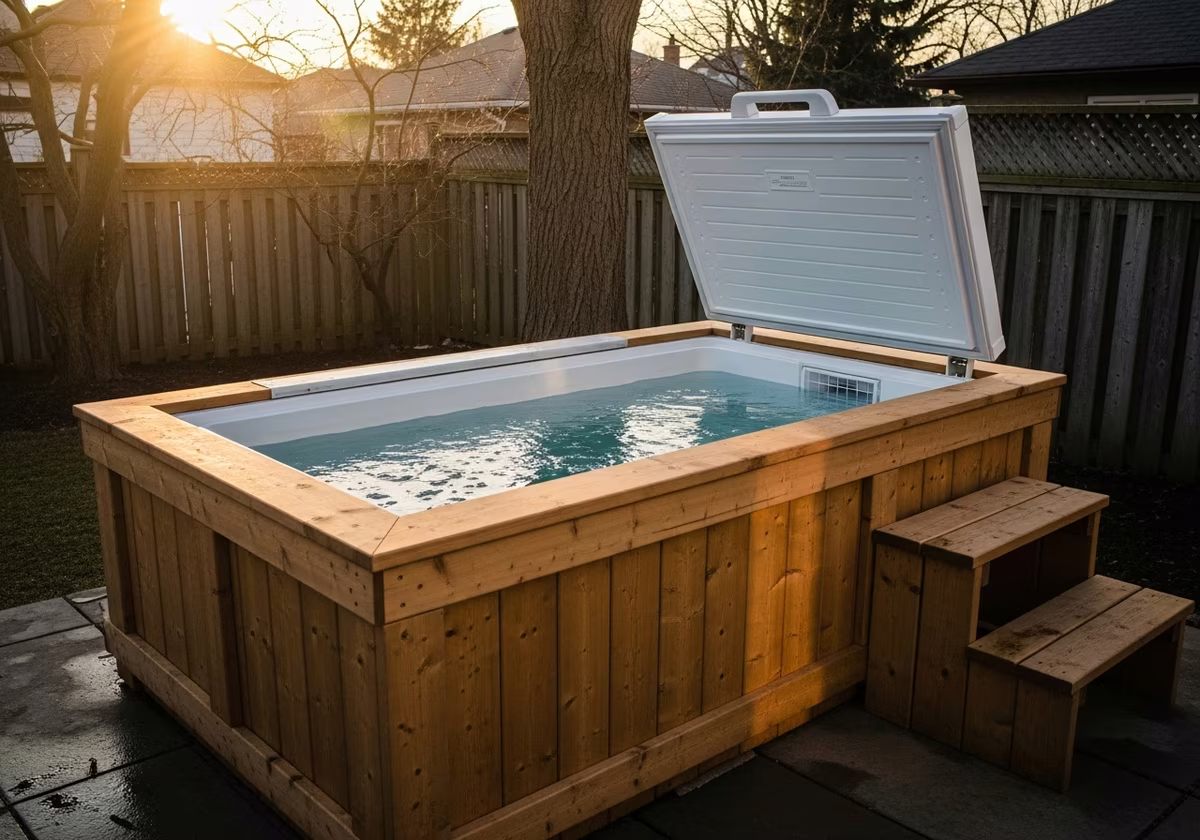
The result is a $400–$1,800 cold plunge that works. Less aesthetic than a Plunge Pro, less reliable than a Cold Stoic, but functional.
The Honest DIY vs Prefab Decision
Before you start sourcing parts, decide which side you're actually on:
Go DIY if
- You're tools-and-process comfortable.
- You're OK with a utility look (white freezer in a basement corner).
- You'll commit to weekly water testing and quarterly filter cleaning.
- Your basement has a floor drain or you're willing to bucket-drain.
- You have an existing dedicated 120V circuit.
- You're ready to absorb a $400 freezer fail at year 4 and rebuild.
Go prefab (skip DIY) if
- You're building toward a resale wellness suite — DIY discount on ROI is real (see Cold Plunge ROI: Does It Add Toronto Home Value?).
- You want it to look like a designed feature.
- You don't want to deal with thermostat wiring or ozone tuning.
- The plunge is part of a sauna contrast suite.
- Your plunge will see daily use by 2+ adults.
If you're on the prefab side, our Cold Plunge Installation Toronto: Complete 2026 Guide covers brand selection.
Toronto Parts List (2026)
This is the build we've helped clients put together with current GTA pricing.
Core hardware
| Item | Source | Cost (CAD) |
|---|---|---|
| 7 cu ft chest freezer (Danby DCF071A6WDB or equiv) | Costco, Home Depot, Best Buy | $349–$549 |
| External thermostat (Inkbird ITC-308 or ITC-2000) | Amazon | $45–$95 |
| Pond pump 600–1,200 GPH (12V or 120V) | Home Depot, Lee Valley | $80–$140 |
| Pleated filter cartridge + housing (5 micron) | Pool/spa supplier | $90–$160 |
| Vinyl liner OR food-grade epoxy coat | Liner: Etsy/eBay; epoxy: Sherwin-Williams Macropoxy | $120–$250 |
| Ozone generator (small home spa unit, 50 mg/h) | Amazon, A1 Pool | $80–$200 |
| GFCI receptacle + cover | Home Depot | $25–$40 |
| Plumbing fittings, hose, clamps | Lowe's, Canadian Tire | $40–$90 |
| Step stool / non-slip mat | Costco | $30–$60 |
Optional but recommended
| Item | Cost (CAD) |
|---|---|
| UV sterilizer (small inline) | $90–$150 |
| Smart plug (TP-Link Kasa) for chiller cycling | $20–$30 |
| Insulated cover (custom or pieced) | $80–$200 |
| Hand rail / grab bar | $40–$80 |
If you're handy and shop carefully, $900–$1,200 is achievable.
Step-by-Step Build
Step 1: Buy the freezer
7 cu ft is the practical Toronto size — fits a 6' adult curled comfortably, footprint about 30"×40", fits down most basement stairs. 5 cu ft is too small for most adults. 10+ cu ft uses substantially more energy.
Buy new. Used freezers may be near end-of-life on the compressor and you'll burn the savings inside a year.
Step 2: Liner or coat
Two viable approaches:
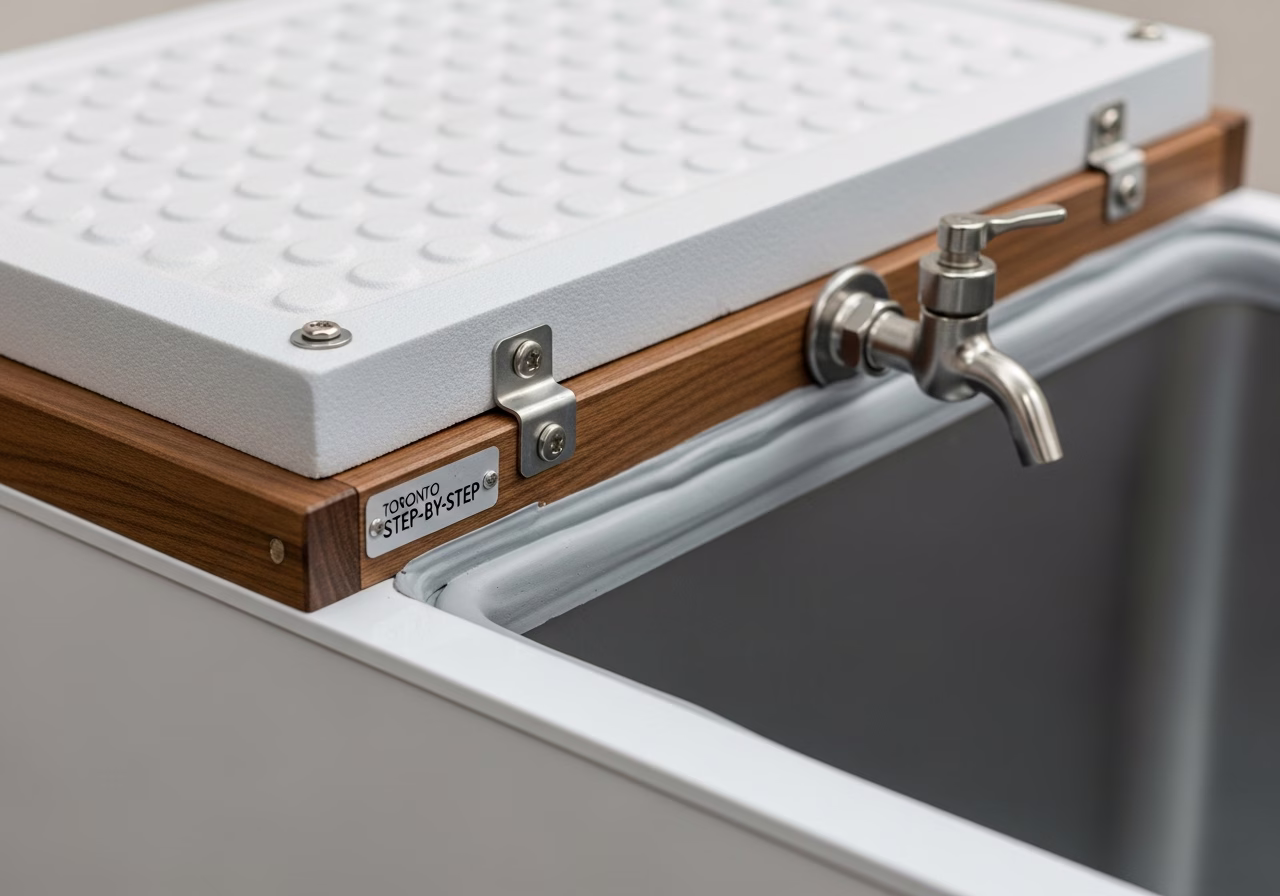
Vinyl liner — easier, removable, cheaper. Custom liners on Etsy run $120–$200. Generic pond liners can work but tend to buckle. Liner extends up over the rim; you fold it back over the lid lip. Food-grade epoxy coat — more durable, looks better, more permanent. Sherwin-Williams Macropoxy 646 or equivalent. Two coats. 24-hour cure between coats, 7-day cure before water. ~$200 in product. Pro option.Either way, the goal is no metal-to-skin contact and a fully waterproof interior.
Step 3: Wire the external thermostat
This is the critical step.
The Inkbird (or equivalent) external thermostat plugs into the wall, the freezer plugs into the Inkbird, and the Inkbird's temp probe sits in the water. The Inkbird overrides the freezer thermostat by cycling power to the whole freezer. When water is above setpoint, freezer runs. When water hits setpoint, freezer cuts off.
Set the Inkbird to 4–10 C (your preference). Set differential (hysteresis) to 1–2 C — wider differential = fewer compressor cycles = longer compressor life.
Install in a dry zone, not splashed by water. Power must be GFCI protected.
Need professional home renovation?
Call RenoHouse at 289-212-2345 or get a free estimate today.
Get Free Estimate →Step 4: Plumb the circulation/filter loop
Pond pump sits inside the freezer, hose goes out to the filter housing, filter outlet returns into the freezer at the opposite corner. The cross-flow keeps water uniformly cold and pulls particulates through the filter.
Pump should run continuously. Power consumption is 30–60 W — minor compared to the freezer.
Step 5: Add ozone
Small spa ozone generator with check valve and diffuser stone. Place stone at the bottom of the plunge. Ozone runs continuously.
Ozone is the difference between a clean DIY plunge and a swampy one. Don't skip it.
Step 6: Sanitation residual
Ozone alone is not enough — it dissipates fast. You also need a low residual:
- Hydrogen peroxide (food-grade 3%) dosed to 30–50 ppm, top up weekly. Tests with H2O2 strips.
- Or chlorine at 0.5–1.0 ppm, dosed every 3–4 days.
Don't use both at the same time — they neutralize each other.
Step 7: First fill and commission
- Fill with cold tap water.
- Set thermostat to 10 C.
- Run pump and ozone for 24 hours.
- Add sanitation residual.
- Test pH (target 7.2–7.6); adjust if needed.
- Drop temp to your target setpoint.
- 12–24 hours later, plunge ready.
Step 8: Safety setup
- GFCI receptacle for everything.
- Non-slip mat next to the plunge.
- Step stool.
- Phone within reach.
- Tell another household member when you're using it.
For full electrical detail see Cold Plunge Electrical Requirements: 120V vs 240V Setup Toronto.
Toronto Code Realities
The DIY chest-freezer plunge sits in a regulatory grey zone:
- ESA permit — typically not required for plug-in modifications to an existing receptacle. If you're adding a new dedicated circuit, ESA permit applies.
- Building permit — none required (no structural change).
- Plumbing permit — none required (no permanent water connection).
- Insurance — disclose to insurer. Most won't surcharge but may exclude flood damage from plunge overflow. Ask.
You're operating an electrical appliance in a wet environment. If something goes wrong (cord shorts, GFCI fails) and there's no permit/inspection paper trail, insurance may decline. Run all electrical changes through a licensed electrician with ESA filing.
Maintenance for DIY
Maintenance discipline matters more on a DIY than on a prefab because the systems are simpler and more failure-prone.
- Weekly: test water, rinse filter, wipe waterline, check ozone bubble.
- Monthly: soak filter overnight, inspect liner for wear, vacuum freezer condenser coils on the back.
- Quarterly: drain, scrub interior, replace water, inspect liner seam, sanitize plumbing.
- Annually: replace filter cartridge, replace ozone diffuser stone, check all hose clamps.
Full schedule applies similarly to prefab — see Cold Plunge Maintenance Schedule: Water Care, Filtration, Cleaning.
Real Performance Numbers (Toronto)
From three Toronto DIY chest-freezer builds we've consulted on:
| Metric | DIY Chest Freezer | Prefab Plunge.com Pro |
|---|---|---|
| Water temp at setpoint | 4–10 C | 3–10 C |
| Recovery from 12 C session | 2–4 hours | 30–60 min |
| Energy use/month | 50–90 kWh | 80–140 kWh |
| Noise (compressor) | 50–55 dB at 1 m | 45–50 dB |
| Year-1 reliability | 95%+ | 99%+ |
| Year-5 reliability | 80–85% | 95%+ |
| Aesthetics | Utility | Designed |
The DIY uses less energy than premium prefabs because it's smaller and less aggressive on the cold setpoint. It also recovers slower — for a daily-use household, recovery time matters.
Five Common DIY Mistakes
We've fixed all of these:
- 1. No external thermostat — relying on the freezer's internal stat lets it freeze the water solid in 6–8 hours. Always use an external override.
- 2. Skipping ozone or UV — water goes swampy in 3–4 weeks instead of 12+ with sanitation.
- 3. Plunging directly on metal — extreme thermal shock; some users report it's painfully cold. Always liner or coat.
- 4. No GFCI protection — code violation and real shock risk in a wet environment.
- 5. Lid hinge failure — the original freezer hinge isn't designed for daily heavy lid lifts. Reinforce with gas-strut shocks ($30 add-on).
We cover the broader build mistakes in Cold Plunge Installation Mistakes to Avoid.
When the DIY Makes Sense vs Doesn't
The honest take:
DIY is the right call for:- Solo user, 2–4 sessions/week, basement utility space, fitness/biohacker focus.
- Tight budget — $1,200 vs $9,000 is meaningful for many households.
- Renters or short-term homeowners who want to take it with them.
- Wellness suite designed for resale.
- Couples or 3+ adult households (recovery time and capacity issues).
- Aesthetic-focused buyers — chest freezers don't pretty up.
- Anyone uncomfortable with electrical work — even with smart plugs, you're working with 120V at 8+ amps in a wet environment.
Upgrade Path
A common DIY journey:
- Year 0–2: chest-freezer DIY. Confirm you'll actually use it.
- Year 2–3: if usage holds, replace with prefab Plunge or Cold Stoic. Move freezer to garage as overflow freezer.
- Year 3+: if you've also added a sauna, build out the wellness suite — see Sauna + Cold Plunge: Designing a Wellness Suite in Toronto.
Many of our wellness-suite clients started with DIY freezer plunges. The DIY proved the practice; the prefab+suite formalized it.
FAQ
How long does a chest freezer last as a plunge?3–7 years typical. Compressor stress from cycling at modified setpoint is the limiting factor. Inkbird with wider hysteresis (2 C) extends life vs tight hysteresis (0.5 C).
Can I do a chest freezer plunge outdoors in Toronto?Not recommended. Outdoor freezers in -15 C ambient have the opposite problem — they can't get the water cold enough because the freezer's heat exchanger needs warmer ambient to dissipate. Indoor only.
How loud is the freezer when running?Typical 50–55 dB at 1 m — about the same as a quiet dishwasher. Fine for basement use; not for adjacent bedrooms.
Can I bath two adults at once?Most chest freezer plunges are 30"×40" — barely big enough for one adult comfortably. Two-adult use means upgrading to prefab.
Do I need a permit for a chest-freezer plunge in Toronto?For the plunge itself, no. For any new electrical circuit, yes — ESA permit. For any new plumbing connection, yes — plumbing permit. Most DIY builds use existing GFCI receptacles and a fill bucket, so no permits are needed.
---
Outgrew the DIY and ready for a prefab-quality install — or starting from scratch with a wellness suite vision? RenoHouse can take you from DIY to designed amenity. Book a free consultation on our cold plunge installation service page.
Sources & References
Authoritative sources cited in this guide:
- Ontario Building Code — OBC official text
- Toronto Building Permits — City permit portal
- Tarion Warranty — Ontario warranty regulator
- CSA Group Standards — Canadian standards
Continue Reading
- How to Install Cold Plunge in Basement: 7-Step Toronto Guide
- Cold Plunge Installation Toronto: 2026 Cost & Setup Guide
- Cold Plunge Cost Toronto: $3K DIY vs $15K Premium Setup


